How it works
Adapter and ViewHolder
LayoutManager
The way in which the data should be rendered i.e., either List or Grid is specified using a LayoutManager. LayoutManager does the actual layout of the child views. RecyclerView provides three basic LayoutManagers:
- LinearLayoutManager – for laying out children as a list either vertically or horizontally
- GridLayoutManager – for laying out children as a grid either vertically or horizontally
- StaggeredGridLayoutManager – for laying out children in a staggered grid format, where each child may have different dimensions
Recycler
RecyclerView Adapter
- onCreateViewHolder
- onBindViewHolder
- getItemCount
- getItemViewType
onCreateViewHolder
parent ViewGroup and a viewType int.The
viewType integer is used to identify the type of child view that needs to be displayed based on the data. Using this you can inflate the necessary view.@Override
public UserViewHolder onCreateViewHolder(ViewGroup parent, int viewType) {
View view = LayoutInflater.from(parent.getContext())
.inflate(R.layout.layout_user_list_item, parent, false);
return new UserViewHolder(view);
}
In this example, a layout is inflated using the LayoutInflater and a new ViewHolder is returned. This View is used as a child view and the ViewHolder is used to identify the views position within the RecyclerView and refer the views inside the child view.
onBindViewHolder
ViewHolder and a position. By referring the view items in the ViewHolder you can show relevant information for the given position in RecyclerView. The ViewHolder is used to refer the view items and the position can be used to get the data from say, an ArrayList.onClickListener in this method you might make the position parameter final. Do not do this. Since RecyclerView will not call this method again if the position of the data in the ArrayList changes. So to handle this condition, you can use the getAdapterPosition() method of the ViewHolder inside onClickListener.Here is an example of onBindViewHolder:
    @Override
    public void onBindViewHolder(UserViewHolder holder, int position) {
        holder.username.setText(usersList.get(position).getName());
        Glide.with(holder.itemView).load(usersList.get(position).getImageUrl()).into(holder.userAvatar);
    }
In the code, userList is an ArrayList. Using the position param, the name of the user at that position in the ArrayList is retrieved. Now using the ViewHolder, the TextView is referred and the name is set to the it.
getItemCount
getItemViewType
    @Override
    public int getItemViewType(int position) {
        int type;
        if (!TextUtils.isEmpty(usersList.get(position).getName())) {
            type = USER_TYPE;
        } else {
            type = HEADER_TYPE;
        }
        return type;
    }
Here the type is represented by a constant integers. Now the type of view to be displayed is returned based on the data. Next change the onCreateViewHolder to return the relevant view based on the view type.
    @Override
    public RecyclerView.ViewHolder onCreateViewHolder(ViewGroup parent, int viewType) {
        View view;
        switch (viewType) {
            case USER_TYPE:
                view = LayoutInflater.from(parent.getContext())
                        .inflate(R.layout.layout_user_list_item, parent, false);
                return new UserViewHolder(view);
            case HEADER_TYPE:
                view = LayoutInflater.from(parent.getContext())
                        .inflate(R.layout.layout_user_list_section_header, parent, false);
                return new SectionHeaderViewHolder(view);
            default:
                view = LayoutInflater.from(parent.getContext())
                        .inflate(R.layout.layout_user_list_item, parent, false);
                return new UserViewHolder(view);
        }
    }
After that in onBindViewHolder bind the correct data to the correct view type using the relevant ViewHolder.
    @Override
    public void onBindViewHolder(RecyclerView.ViewHolder holder, int position) {
        int itemViewType = getItemViewType(position);
        if (itemViewType == USER_TYPE) {
            ((UserViewHolder) holder).username.setText(usersList.get(position).getName());
            Glide.with(holder.itemView).load(usersList.get(position).getImageUrl()).into(((UserViewHolder) holder).userAvatar);
        } else {
            ((SectionHeaderViewHolder) holder).sectionTitle.setText(usersList.get(position).getType());
        }
    }
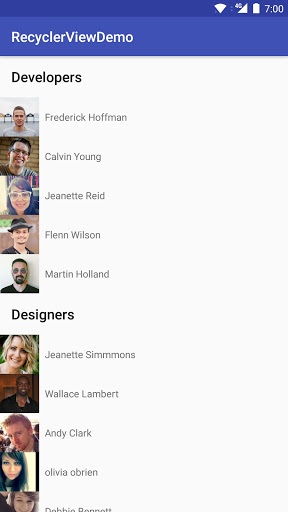
Here is how the UI looks like:
Here the bold titles are the section headers which is represented by type HEADER_TYPE and user views are represented by type USER_TYPE.
This is how you can create a simple RecyclerView.
In the next post, I will cover how to decorate items like adding dividers and how to animate the views when new view is added, or a view is removed or changed.
Source code here.
If you have any feedback, please comment below.

Reblogged this on basheerabdulwahab.
LikeLike